REDRightHand – Installation guide
REDRightHand is a software application that pulls data from your REDCap project and converts it to tidy, normalized data tables. For more information about REDRightHand, see the main REDRightHand page on this site.
To use REDRightHand, you will need:
A. A REDCap project that grants you appropriate user permissions
B. A REDCap API key
C. A safe place to store data, with Windows and Microsoft Access (2016 or newer) installed.
Each of these are discussed below, under “Requirements.”
As soon as you have these required items, you can jump down to these three steps:
1. Download and install REDRightHand
2. Configure REDRightHand
3. Get your data.
Requirements
A. REDCap project and permissions
REDRightHand pulls in data from a selected REDCap project. So, of course, you need a REDCap project.
Once the REDCap instruments have been created, you’ll need to ensure that your REDCap project grants you the permissions required to export the data you want.
If you’re the administrator of the REDCap project, you automatically have export permissions for all instruments. However, if you want to check or change your permissions, choose the “User rights” link from the left sidebar of your REDCap screen. From the list of users, click on your own username and choose “Edit user privileges.”
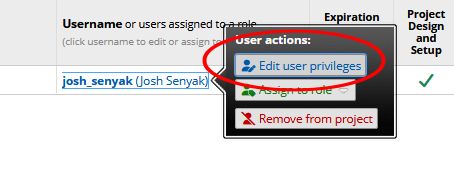
NOTE: If REDCap doesn’t allow you to set your user privileges, you may need the project’s owner or administrator to grant you the privilege you need.
Be sure you’re allowed to export the data you want. For each instrument in the project, set the “Data Export Rights” as shown below. (“No Access” means that you won’t get any data to the relevant instrument; the other options allow you to get some or all of the data.)
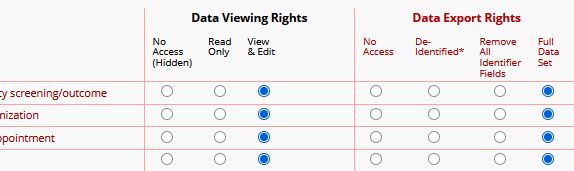
If you’ve made changes, you’ll need to save them – but you can wait until you set your API permissions, below.
B. The REDCap API token
Next, you’ll need to activate your API access to this REDCap project. API stands for Application Programming Interface. It’s a way for REDCap to communicate with other pieces of software (in this case, REDRightHand.)
If you’re not already viewing “Edit User Privileges” for your user account, follow the step above to do so. Now, under “Basic Privileges” on the right, scroll down until you see the “API Export” checkbox.
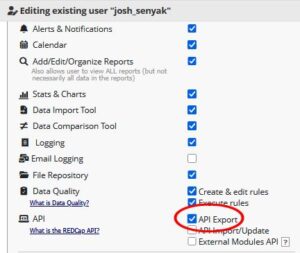
Check the box, then click the “Save changes” button to save your Export and API permissions.
To keep your data safe, REDCap uses an encoded “API token.” This is like a password used only for API transactions with the database. To get your API token, click the API link under Applications in the left sidebar, as shown below. (If you don’t see this link after giving yourself API permissions, try refreshing the REDCap screen, or logging out of the project and logging back in.)
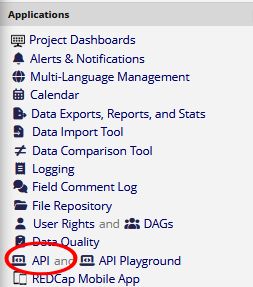
Then click the button marked “Request API token.” Your REDCap administrators will assign you a token and alert you by email, usually the next day. The token is a string of letters and numbers which is 32 characters long. Copy the token from the email and keep it in a secure place. (If you lose the token, you can also click the API link as in the step above to see it in REDCap.) The token allows API access to this one REDCap project, and it is specific to you and your granted permissions.
C. A safe place to store data
REDRightHand requires Microsoft Access (version 2016 or newer), which runs only on Microsoft Windows. If you happen to be using the Research Analysis Environment (RAE) at UC San Francisco, you’re already covered; it’s a Windows environment and Access is pre-installed..
If your export permissions from your REDCap project could include PHI, you must ensure that REDRightHand is installed on a machine that is appropriately secured. Again, UC San Francisco’s RAE is considered a secure environment. Or you may install REDRightHand on your laptop or desktop computer, so long as it’s authorized to store PHI.
Create a folder on your target machine to hold REDRightHand. You may name the target folder whatever you like. We’ll call it “rrh” in this guide.
Now you’re ready to download and install REDRightHand.
Step 1: Download and install REDRightHand
Visit the REDRightHand downloads page at https://quicksilverconsulting.com/downloads-and-documentation and find the link for downloading the latest version of REDRightHand. Download the file (a zip archive) to your target folder. (If your browser downloads the file without asking you for a location, locate the file—most likely in your Downloads folder—and move it to your target folder.)
Extract the software from the zip archive. After you’ve extracted it, you can delete the zip archive. If you’ve set your Windows to show filename extensions, you can easily tell the two apart: the software has an .accdb extension and the zip file has a .zip extension.
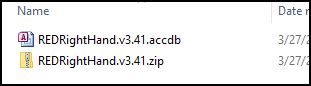
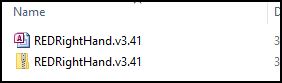
If your Windows isn’t set up to show filename extensions, you’ll have to tell the two apart by their icons, since they have the same name. The icon for the Access database is a red letter A and the icon for the zip archive is a folder with a zipper, as shown below.
Step 2: Configure REDRightHand
Double-click the Access file REDRightHand.v.3.41 to open the software.
NOTE: In some Windows environments you will see warnings like the following:
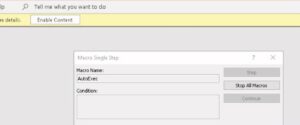
If so, click “Stop All Macros” and then “Enable Content.” When Windows asks you “Do you want to make this file a Trusted Document?” click Yes.
You’ll see a window showing the software agreement. To continue with using REDRightHand, read the agreement and click “I understand and agree” to confirm your agreement.
REDRightHand now shows you the Parameters screen, as shown below. You’ll need to enter a few pieces of information to get started.
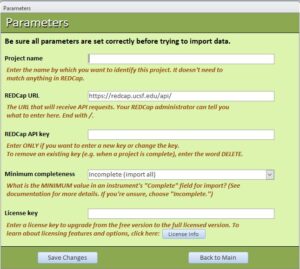
Project name: You can give the project name as shown in the REDCap screen, or you can choose any nickname you like. This name is strictly for your own convenience, so you can identify the project that this copy of REDRightHand is working with.
REDCap URL: We’ve pre-filled this field with the correct URL for UC San Francisco. If your REDCap project is hosted elsewhere, you’ll need to replace this URL with the correct URL for your institution. It should be embedded in the code you’ll see if you click the “API playground” link on your REDCap page. If you’re not sure, ask your REDCap administrator for the URL to use for API requests.
REDCap API key: Also known as the API token. You requested this token in step B. above. Enter it here.
When you save the data on this form, the API token is stored in REDRightHand. If you then leave this form and return, this field will appear as if empty. Don’t worry: the API token is still stored. If you don’t change the token, you don’t need to enter anything further to this field after initial entry.
Note that the API token is stored in REDRightHand in obfuscated form, for security’s sake. However, this approach is not considered true encryption. A knowledgeable and persistent attacker would be able to discover the true API token by inspecting the software. This is another reason why REDRightHand should only be installed on a secure platform, where access is limited to trusted parties.
Minimum completeness: Every REDCap instrument ends with a built-in field that asks whether the data entry for the instrument is “Incomplete,” “Unvalidated” or “Complete.” These terms have no inherent meaning in REDCap; it is entirely up to the researcher to decide how to define these terms and, in fact, whether to use this field at all in data entry.
In the Parameter screen, this field allows you to select the minimum completeness of records to download. If you choose “Complete,” for example, then records marked as “Incomplete” or “Unverified” would not be downloaded to REDRightHand.
If you’re not sure what to do with this field, leave it on the default value (Incomplete). This tells REDRightHand to download all records, regardless of completeness. You can always change this option later.
License key: If you have a sixteen-digit license key, enter it here to upgrade REDRightHand from the free version to the full licensed version. The free version will download data for up to 50 participants per REDCap project; the licensed version has no such limitation. If you don’t have a license key, you can leave this field blank for now.
When you’ve entered the relevant data, click “Save changes” and then “Back to Main.”
Step 3: Get your data
If you’ve installed and configured the software correctly, congratulations! You’re ready to get your data from REDCap. From the REDRightHand Main Menu, click the “Refresh Data” button. REDRightHand will give you a couple of warning screens, and then it will begin the download and parsing of your REDCap data. After a few minutes, you should get a confirmation screen telling you that the refresh has been completed. The data tables have been filled with data from your REDCap project; you can view them by clicking the “Show/hide tables” button.
If you have any questions regarding the workings of REDRightHand, or if you encounter errors while using the software, consult the REDRightHand User’s Guide for more information.